What is a convolution?
The mathematical formulation of a convolution is as follow:$$(f*g)(t)=\int_{-\infty}^{\infty}f(x)g(t-x)dx$$
But, what this formula means? what it does?, let see an example. Let define f(x) as:
$$ f(x)=\left\{\begin{matrix} 1, & |x| \leqslant 1 \\ 0, & otherwise \end{matrix}\right.; $$
And let define g(x) as:
$$ f(x)=\left\{\begin{matrix} 1 - |x|, & |x| \leqslant 1 \\ 0, & otherwise \end{matrix}\right.; $$
The convolution of f(x) and g(x) will define a new function in which the values of (f * g)(t) will be the area enclosed by f(x) and g(x) in the instant t.
Since an image can be treated as a function of two variables that returns the color of a pixel relative to its coordinates, we can extend the mathematical definition of the convolution to the following formula:
$$(f*g)(u, v)=\int_{-\infty}^{\infty}\int_{-\infty}^{\infty}f(x, y)g(u - x, v - y)dxdy$$
How convolution formula is applied to an image?
An image can be treated as a discrete function, so we will use the discrete form of the last formula:
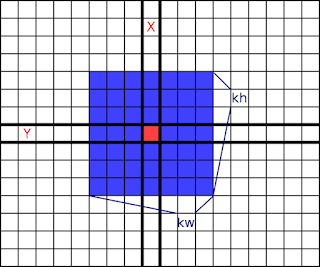
$$ pixel(x,y)=\sum_{j=0}^{kh}\sum_{i=0}^{kw}inImage\left(x+i-\frac{kw-1}{2},y+j-\frac{kh-1}{2}\right)kernel(i,j) $$
inImage is the image in which we will apply the convolution over every pixel, kernel is a kw * kh array values, the convolution is applied to a group of pixels in which the center of the kernel y aligned to the coordinates of the pixel that is begin processed. Graphically:
The pseudo-algorithm for convolution is:
for (y = 0; y < height; y++)
    for (x = 0; x < width; x++) {
        pixel = 0;

        // Apply convolution
        for (j = 0; j < kh; j++)
            for (i = 0; i < kw; i++)
                pixel += inImage(x + i - (kw - 1) / 2, y + j - (kh - 1) / 2) * kernel(i, j);

        outImage(x, y, pixel);
    }
The source code
At this point there is not much to explain, just apply the algorithm above. This is the source code for the project file in Qt Creator:
QT += core gui

TARGET = convolution
CONFIG += console
CONFIG -= app_bundle

TEMPLATE = app

SOURCES += main.cpp
And this is the source code for main.cpp:
#include <QCoreApplication>
#include <QImage>

int main(int argc, char *argv[])
{
    QCoreApplication a(argc, argv);
    Q_UNUSED(a)

    QImage inImage("lena.png");
    inImage = inImage.convertToFormat(QImage::Format_RGB32);
    QImage outImage(inImage.size(), inImage.format());

    int kw = 3;
    int kh = 3;
    qreal kernel[] = {0, 0, 0,
                      0, 1, 0,
                      0, 0, 0};

    int offsetX = (kw - 1) / 2;
    int offsetY = (kh - 1) / 2;

    for (int y = 0; y < inImage.height(); y++) {
        QRgb *outLine = (QRgb *) outImage.scanLine(y);

        for (int x = 0; x < inImage.width(); x++) {
            qreal pixelR = 0;
            qreal pixelG = 0;
            qreal pixelB = 0;

            // Apply convolution to each channel.
            for (int j = 0; j < kh; j++) {
                if (y + j < offsetY
                    || y + j - offsetY >= inImage.height())
                    continue;

                const QRgb *inLine = (QRgb *) inImage.constScanLine(y + j - offsetY);

                for (int i = 0; i < kw; i++) {
                    if (x + i < offsetX
                        || x + i - offsetX >= inImage.width())
                        continue;

                    qreal k = kernel[i + j * kw];
                    QRgb pixel = inLine[x + i - offsetX];

                    pixelR += k * qRed(pixel);
                    pixelG += k * qGreen(pixel);
                    pixelB += k * qBlue(pixel);
                }
            }

            quint8 r = qBound(0., pixelR, 255.);
            quint8 g = qBound(0., pixelG, 255.);
            quint8 b = qBound(0., pixelB, 255.);
            outLine[x] = qRgb(r, g, b);
        }
    }

    outImage.save("out.png");

    return EXIT_SUCCESS;
}
Some examples
You can try giving different size and values to kernel and see what results you get. Here are some examples:
// Identity kernel (original image)
int kw = 3;
int kh = 3;
qreal kernel[] = {0, 0, 0,
                  0, 1, 0,
                  0, 0, 0};
// Edge detection
int kw = 3;
int kh = 3;
qreal kernel[] = {-1, -1, -1,
                  -1,  8, -1,
                  -1, -1, -1};
// Sharppening
int kw = 3;
int kh = 3;
qreal kernel[] = {-1, -1, -1,
                  -1,  9, -1,
                  -1, -1, -1};
// Brightness
int kw = 3;
int kh = 3;
qreal kernel[] = {0, 0, 0,
                  0, 2, 0,
                  0, 0, 0};
// Blur
int kw = 7;
int kh = 7;
qreal kernel[] = {1. / 49, 1. / 49, 1. / 49, 1. / 49, 1. / 49, 1. / 49, 1. / 49,
                  1. / 49, 1. / 49, 1. / 49, 1. / 49, 1. / 49, 1. / 49, 1. / 49,
                  1. / 49, 1. / 49, 1. / 49, 1. / 49, 1. / 49, 1. / 49, 1. / 49,
                  1. / 49, 1. / 49, 1. / 49, 1. / 49, 1. / 49, 1. / 49, 1. / 49,
                  1. / 49, 1. / 49, 1. / 49, 1. / 49, 1. / 49, 1. / 49, 1. / 49,
                  1. / 49, 1. / 49, 1. / 49, 1. / 49, 1. / 49, 1. / 49, 1. / 49,
                  1. / 49, 1. / 49, 1. / 49, 1. / 49, 1. / 49, 1. / 49, 1. / 49};
// Gaussian Blur (Denoise)
int kw = 5;
int kh = 5;
qreal kernel[] = {1 / 273.,  4 / 273.,  7 / 273.,  4 / 273., 1 / 273.,
                  4 / 273., 16 / 273., 26 / 273., 16 / 273., 4 / 273.,
                  7 / 273., 26 / 273., 41 / 273., 26 / 273., 7 / 273.,
                  4 / 273., 16 / 273., 26 / 273., 16 / 273., 4 / 273.,
                  1 / 273.,  4 / 273.,  7 / 273.,  4 / 273., 1 / 273.};


Good information . Thanks alot
ReplyDelete